Thursday, 31 December 2015

Sewing for pleasure with scraps

I found time to sort through my bits and bobs of fabric bag (ok bags). I find it difficult to throw away even the smallest scraps of fabric. I have admired the work of many artists who create collages with fabric so when I spotted a small plain lampshade decided it was time to have a go.  


It was great fun rummaging through the scraps of fabric and piecing them together to make a street. The trees and doors have tiny little buttons stitched on before attaching to the shade.

 
It looks so pretty lit up before bedtime. This is my first and I intend to make a couple more during the next year.

 
The two photos below were taken in 2014 of the Alter Cloth that I sewed for a local church. A group of children and local artist all worked on it and presented it from school to the church. I don't think I'll be doing such a large project for a while, sticking to smaller size projects for next year.


Happy New Year and thanks for visiting
Debbie
xxx
 

Wednesday, 30 December 2015

Rolled PaperTrees

I'm finishing my 2015 of blogging with a couple of gifts I made. I have taken inspiration from a few different pinners on Pinterest. The style has popped up in the form of tags, cards and canvas's and I'm not sure where it started but I thoroughly enjoyed making them.
 
 
They are 20cm by 30cm and for the first I used my precious papers from Graphicus, I still have a few in my stash and stroke them from time to time.
The backgrounds for each of them is old book pages and mixtures of paints applied with baby wipes rather than the uniformity of a paint brush. When the paint had dried I stamped with the circles from Decorative Edges and blue ink.
 
 
The second is made in the same way using different colours and paint. The stamp I used is the
 Open Weave with brown ink. The paint background was a little bright so I also used sequin waste with more ink.
 
 
I changed the shape of the tree and added words to it, I have called them Wishing Trees. The rolls of paper were cut to different lengths and as on each tree, added the white pen faux stitching. The stamped background uses the Floral Weave stamp. This photo shows the computer generated words I have used.


Another tree using green, blue and yellow paint then stamped with an enormous circles stamp that was a gift to me from a crafty buddy.
 
 
Wishing you all 'Best Wishes' for 2016
Debbie

Friday, 18 December 2015

Colourful Flowers

 
Welcome to all.
My cards today are made with lots of colour, inspired by the colourful Christmas trees I have spied in peoples homes recently.
 
 The first card is made using the Open Weave and Swirl Centre stamps. The background is made from a couple of the new distress ink colours rubbed onto the card and then water flicked on helping to blend them. The open weave stamp was added around the edges, I used Wild Plum Adirondack ink for a more subtle effect. Only two flowers were used for the card, one in the centre and the second was cut for the corners. These flowers are really detailed and I'm really impressed at how the detail is picked out when embossed with powder. I coloured the flowers with colours from the pallet used on the background, pink, oranges and yellow. 
 
 
This card came from playing with inks and water. I coloured the white card with Tumbled Glass, Broken China and Stormy Sky Distress Inks, shading them down to create an ombre effect. I lightly misted the Studded Lattice stamp with water and stamped onto the card. The water on the stamp left the pattern from the stamp on the ink background. With the Magnolia single clear stamp I first stamped it with black ink onto the card and then onto book page paper and coloured with pencils. I fussy cut out the flowers and glued onto the card. The sentiment was added and to finish I matted onto black and then added to the A5 base card.

 
Many thanks for visiting
Debbie

Saturday, 5 December 2015

New Lattice Stamps

Good morning.
 
I am excited to be sharing a card and notelet set I recently made for Lesley to take with her to The Craft Channel for the recording of the Chocolate Baroque shows.
The stamps will be on the shows that are being aired this weekend so if you'd like lots of inspiration from Lesley, check the channels schedule for the show times.
These new stamps and a couple more are exclusive from The Craft Channel until the 7th of December.
 
The open Open Weave stamp has been used for the background of this card along with splatters of different colour inks. This stamp along with the others are ideal for mixed media projects.
 
 
I really enjoy giving handmade gifts to people and this set of notelets are going as a Christmas present. The Floral Weave stamps are a lovely size for A5 cards. I used water soluble oil pastels to colour the stamp and spritzed with water before stamping onto white card. If the stamp is spritzed again you can get a second image. These were great fun to make and quick.
 
 
Many thanks for visiting
 
Debbie

Friday, 20 November 2015

One Stamp Dotty Flowerhead Card

 
Good morning,
 
I decided to make a card with lots of colour.
I used the Dotty Centre Flowerhead as a one stamp card.
 
 
After several attempts with small inkpads and brush marker pens with not a lot of success. They either dried to quickly not laying down much colour or the ink mixed more than I wanted. These stamps are large and I wanted multiple colours on each flower. I turned to my water soluble oil pastels and am delighted with the results. There are many brands of water soluble crayons.


For the background I  coloured the Flowerhead stamp with the purple pastel, next the pink then the orange. Because the flower is large you can colour it easily. When finished colouring spritz with water and stamp onto the card. I repeated stamping the flower, spritzing with the water each time. When the flowers had been stamped all over the card I used Picked Raspberry on the edges.
I used Picked Raspberry, Squeezed Lemonade and Rusty Hinge Distress inks for the tag and stamped with a Black Versafine inkpad. The sentiment is from Positive Beauty clear stamps.
I'm keeping this card on my desk for a while so I see it  before looking through the window at the dull skies.
 
Have a great day
Debbie


Sunday, 8 November 2015

Daisy Flowerheads

Good morning.
After having a couple of days of dull skies and lots of fog I decided to use more sunny colours with the  Daisy Centre Flowerhead stamp.
 
For the flower I used Ebony Wow powder with Versamark ink, I find it helps when using watercolour pencils. The petals were filled in with yellow pencil and the centres of the flowers.
The daisies on the background are from Sunny Sunflowers and I thought they work well.


I took a close up photograph of the centre so it is easier to see.


My second card is a similar design but I made it DL size, again a similar design as the first and using warm orange pencil.

 
Many thanks for visiting
Debbie

Friday, 6 November 2015

Inspired

Just  quick post while I catch up on the weekly soaps. I was inspired to retrieve a hidden canvas that had been given to me many months ago. Tracy Weinsapfel has a video tutorial on her blog most weeks and they are great fun. I fell in love with the sunflower canvas and the video was detailed through the steps that I followed.


I took it into school as I'd been telling the children in class about it and how it had was fun to do. I hadn't added the words but after talking to them chose inspire, dream and believe as I think they are so important while educating young people. The children loved it and we talked for a while and asked them to write what inspired them. It was really interesting to find out what their dreams and inspirations are. Hopefully after Christmas I will be able to run an after school group (mainly boys) who are wanting to make their own canvas.
Well off to finish packing for a busy weekend.

Thanks for visiting

Sunday, 25 October 2015

Colourful Edge Cards

 
Hello.
I hope that visitors in the UK have remembered to turn the clocks back, giving us an hour of crafting daylight during the winter months. I'm already starting to think about where my spring bulbs will pop up as I can't remember where I've planted them.
 
Two cards from me today showing the Exquisite Edges and Owl Edges.
 
 
I felt the first was the easier as I took inspiration from the three colours of the Distress Ink background. The palms of the stamp were coloured with red pens. The Peacock was stamped onto a spare piece of the background. I used Versamark and Black WOW powder for both.

 
The bulrushes from Owl Edges reminded me of a photograph my husband had taken while out walking near where we live across the pond. There was a dragonfly in the photograph and I substituted it for a fairy.
 
Many thanks for visiting
Debbie


Sunday, 11 October 2015

Exquisite, Elegant Edges

 
Good morning.
 
I was lucky to see the Owl and Exquisite Edges in the early stages of production and I must say Lesley has done a marvellous job of putting them together. They are going to feature regularly in my cards.


For both cards I chose to stamp the Exquisite Edges with Versafine and embossed with black powder as I wanted them to stand out from the Brusho backgrounds. I had made a few A4 backgrounds so had ample for stamping the Sunny Sunflowers and Waterlily Mandala. For the first card I added a little colour with pens to edge.


There are many more projects from the girls to come with lots of inspiration. Many thanks for visiting and don't forget to leave a comment for the chance to win a £15.00 gift voucher from Lesley.
 
Debbie

Monday, 28 September 2015

Boo!!! in a Pop up Box

 
Hi.
I wanted a small project that would showcase many of the Halloween stamps together.
Fortunately I have a die that cuts the pop up box so the measuring was taken out of the making.

 
The white decorating panels were stamped with Memento Black ink and coloured with alcohol pens. For the edges a little distress ink was rubbed. The ghosts in clusters were stamped and cut out then glued onto the strips of card that are in the centre of the box. I adore our little owl bat so sat him at the top.
 
 
For the card I wanted to show how the open book stamp looks great with the ghosts floating above them. Other stamps from the sets work well too.


Many thanks for visiting
Debbie

Monday, 14 September 2015

Spooky, Drink if you Dare

 
Hi.
My inspiration for todays projects comes from all the bottles that are being decorated by people on pinterest. I thought these would look great sitting on the windowsill where the visiting children will see them.
The bottle were bought from the pound shop and the straws were included.
 
 
I didn't want to add lots of texture but wanted bright colours that couldn't be seen through.
 
The first was the orange bottle and I prepared it with clear gesso, waited for it to dry and applied the Dylusions Squeezed Orange paint. I stamped onto the dry paint with Black Archival with stamps from Put a Spell on You. As I had waited over twenty four hours for the drying process, I decided to try painting the Fresh Lime and Crushed Grape directly to the bottle.  I was delighted to see the paint didn't puddle and gave great coverage.The witch on the green bottle is from the Hocus Pocus stamp set. For the grape coloured bottle I stamped onto a die cut label  and attached with ribbon. A little twine was added to the neck of each bottle and I used stamps from each set to decorate the straws with circles of card.
 
 
For the card I cut a circle as a moon mask and applied the two colours with soft bristle brushes. Both sets of the stamps mix so well together.
 
Many thanks for visiting
Debbie

Friday, 11 September 2015

My Artwork on Display in an Art Gallery

 
I am really fortunate to be included on our schools annual educational visit to London. We visit many of the wonderful tourist attraction and take in a show. The British Museum to see the Egyptian exhibition, the theatre to watch Matilda, a trip along the Thames and the London Eye.


The best part of the visit for me is the Tate Britain. I have been four times now and admire many of the artwork and some of it puzzles me. I understand that art comes in all forms but some of it I think the children I work with could produce better.
 
I feel very strongly that many, many friends and acquaintances have in the past been told, usually be a teacher, that they are not good at art. Everybody can produce art if they are shown the techniques and tools to do it.


I had an idea a few weeks ago to take a couple of my pieces that I made recently with me and with a lot of stealth and eagle eyes (looking for the guards)
 
I DISPLAYED MY ARTWORK IN THE TATE BRITAIN GALLERY


This is my favourite photo as it is in front of a Brigit Riley who I greatly admire her work, it satisfies my maths brain.

 
I did warn the leaders of our group that I may be carted out of the gallery, fortunately everything went smoothly. I'm sitting thinking how cheeky but how many living people have displayed at the Tate with me (insert smiley face)
 
Many thanks for visiting
Debbie
xx

Friday, 4 September 2015

Flower Canvas

Last week I was having a really great play with the canvas's I had stored in my room.
I think maybe I had some one else's mojo as I had real fun.


I used the techniques that were used on the workshop and Chocolate Baroque Fresh Blooms stamps.
I discovered that I thoroughly enjoy doodling and have invested in a couple of decent black and white pens. I stamped the flowers and filled in some of the details. The paint is a PaperArtsy paint and covered the paper will. I drew in the stalks and the flowers really popped when the black and white outline was added. I love this size canvas and now have another to add to the wall.

Thanks for visiting
Debbie

Thursday, 3 September 2015

More Painty Fun

 
Following my post on I have another canvas to show.
I was inspired by a few of the other ladies work, they had used a large butterfly on their artworks.
 
 
I have a large butterfly from Patchwork Butterfly and it is a perfect size.
There is a lot of detail on the stamp and I did need to draw some of it in with a pen due to the texture on the canvas.
I will put this one into a frame and at the weekend am going to put my pieces on the wall up the staircase. I have another to show that I really enjoyed making and will post soon.
 
Thanks for visiting
Debbie

Monday, 31 August 2015

Serena the Winter Lady


Good morning
I have the pleasure of being the last post of the month. There are many, many inspirational cards and projects lined up for the month of September and I know that Lesley has some fantastic ideas lined up for the future.


I truly gasped when I saw Serena, her name suit her so well.
 
She was stamped onto white card with Black Versafine ink and embossed with clear powder. I feel comfortable using alcohol pens for skin so did her face first and the rest was watercolour pencils. I used lighter and darker pencils for her hair, to give depth to her hair. Serena is a large stamp and the dies I chose frames her well. The sentiment was added under Serena.
 
Thank you for stopping by
Debbie

Sunday, 30 August 2015

Colourful Fun with Friends

 
Hi.
Last weekend I had the pleasure of attending a weekend workshop, three in total, with the wonderful Birgit Koopsen  Bernstein. The workshop was hosted by my good buddy Sue and it was such a delight to see so many friends with  a few lovely newbie ladies.


The Friday evening we played creating gelli plate prints from tools we made ourselves,(great fun).
Saturday was spent making two canvases. I thoroughly enjoyed embracing colour and really learned a lot.
On Sunday morning was messy play time, inks, paints, shaving foam, stencilling, stamping all in preparation for journaling during the afternoon.


I have played lots during the last week and will try and blog the photos this week.
 
Thanks for visiting
Debbie


Monday, 17 August 2015

Pine Cones Frame


Good morning.


 Using the pine cones with branches I decided to make a frame for a die cut label
with sentiment to sit in.
I started by lining up the four corner stamps, then stamped the single pine cones to make a rectangle. The single cones are ideal as more can be stamped to make other sizes and shapes.
I stamped with Versafine Black ink and coloured with watercolour pencils. The edges were softened with Vintage Photo distress ink and the label was also coloured.
The sentiment is from Christmas Magic and embossed with gold powder. A little gold stickles was added to each pine cone but unfortunately it was difficult to see on the photograph. 
 
 
I have a large amount of small cards in my stash that will be used for neighbour cards this year and the pine cones make perfect corners for the stamped sentiment.
 
Many thanks for visiting
Debbie


Wednesday, 12 August 2015

Tree Tags

 
Morning.
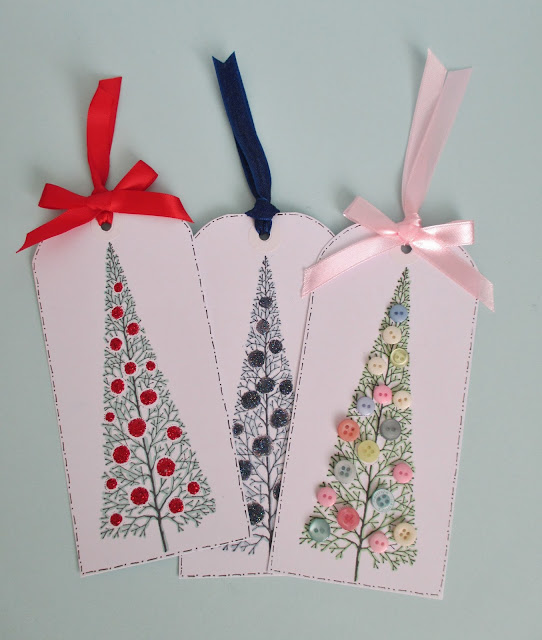
I decided to use one of the tree stamp from Sparkling Trees for my gift tags this year.
They lend themselves to the shape and size of a tag.


Each of the trees is stamped with Memento black and then I coloured over the branches with different coloured Alcohol pens.
The tag with the pastel buttons is coloured with a soft green and I glued the buttons where the circles are.


These tree tags are coloured with green and blue Alcohol pens and the glitter was added to the circles with a Zig glue pen. I added a faux stitch line around the tag with a fine line pen.
 
 
Many thanks for visiting
Debbie

Friday, 7 August 2015

Elegant Tree card

 
Good morning.
 
Well my card production is in full swing now and I hope this year to be prepared for the festive season. I'm loving the elegance of this tree and it's so versatile.


I love DL (double length) cards and the tree is perfect for them.
The tree was stamped with Versamark ink and embossed with WOW Red Glitz powder. The powder has very fine glitter in and I wanted to keep the fine detail of the words on the sentiment so I stamped with Vermillion Archival ink. I trimmed the tree and sentiment punched the corners and matted onto red card. I've learned through experience to add liquid pearl dots last. The advantage to using liquids pearls is that you can make the various sizes.
 
Many thanks for visiting
Debbie

Monday, 3 August 2015

Rejoice Sweet Angel

 
Good morning.
 
 
My card today started with the colouring of the angel Rejoice I stamped her onto white card with Memento black ink and coloured with Alcohol pens. A little Wink of Stella clear pen was used on her wings. When I had cut her out I wanted to use a few of my crafty bits and bobs that have been left at the back of the cupboard.
First out of the cupboard was a sheet of parchment paper and I stamped and embossed snowflakes with Versamark and white embossing powder. Second, I coloured the back of the parchment with Pan Pastels, that I don't use as often as I should, helping to give definition to the snowflakes.
The sentiment is from Christmas Candlelight. I stamped all of the candle image and cut around the wording adding a little colour to the words. The parchment was attached  with tape and I added the ribbons to cover the tape and fixed the Angel and sentiment with foam pads.
I hope this has inspired you to use  a few forgotten  past purchases.
 
Thanks for visiting
Debbie

Tuesday, 28 July 2015

Something Blue

 
I was the happy recipient of a few bottles of the most gorgeous colours of inks from Linda over at Oak House Studio.
I have admired artwork from lots of talented people who make such beautiful pieces.
Tracy Easson has many fabulous girls, often colouring with the inks.
 
I'm a member of the Oak House Studio facebook group and there's a challenge on there to make something blue. So while taking a break from stripping wallpaper I made three 10 x 10 cm piece with my new Blue Jeans ink.
 
 
These were quick makes, starting with a colour wash of blue on the water colour paper. I used the paint brush to add strokes and a little stamping on the first.
 
 
This one has only the tip of the brush touched to give the look of grasses.
 
 
For the last I stamped the under the sea image from Seaside Dreams.
 
I hope to steal some play time this afternoon to experiment further with my other inks
 
Thanks for stopping by
Debbie